Friday, September 25, 2009

Purple Beans?

Yes, purple beans.

A while back I bought a packet of Tri-Color Beans. Really, it was a packet that promised pole beans that were not just green, but also yellow and purple. I was really hoping to find yellow pole beans (a.k.a. "wax beans" -- that don't taste like wax, mostly just like green beans), but they only had green or this. So, I went with this.

I've now harvested a bunch of the beans and can give a review of them.
Green & Purple
You'll notice that there are NO yellow beans. I have yet to see a-one. I've seen cream-colored bean flowers, yellow bean flowers, and purple bean flowers. But I've only seen purple and green beans.

Normal ol' green pole beans look like this.
Green Pole Beans
But the intertwined purple and green (and yellow) vines are actually pretty cool looking.
Purple Pole Beans
You can see which vine is going to produce purple and which is going to make green (or yellow).  And this brings up a point about why I like yellow/wax beans. You can actually see the beans! Same deal with the purple beans. You can actually see the beans! With the green beans, they are the same color as the vine and the leaves and they frequently look just like the stems. This is not the case with the yellow and purple beans.

But here's my disappointment. The purple of the beans is only skin deep. No, really. Only about a single layer of cells are purple. When you snap and string them, the part that is snapped is green in cross-section and the part where the string was is also green. How disappointing.

But even more disappointing is that, upon steaming, the purple disappears and becomes a slightly duller green than the steamed green beans.

The two don't really taste any different from each other. However, you really need to stay on top of harvesting the purple ones even more than the green ones. The purple beans get much stringier and they get much, much woodier much faster. If you compare a green bean and a purple bean that have just gone past their prime, the green pod is a little tough, but the purple pod is woody. This is not a selling point for the purple beans unless you can stay on top of harvesting them daily.

IMHO, there are two reasons to opt for the purple beans:
The coolness factor -- purple beans look really cool... on the vine.
They're easier to find on the vine to harvest.

I think I'll spend some time this winter seeing what I can find in the way of yellow pole beans. They (and the green ones) are much more forgiving if you skip a day.

Thursday, September 24, 2009

Germinating My Winter Veggies

A few days ago I did a post where I mentioned that I had planted a couple of 6-packs of lettuce and one of basil. They were planted a week ago today and left to germinate (watered daily in this heat) in this setup.
The Lettuce Germination Setup
Some things to note in the picture include:
  • The bottoms of the mini-flats are almost exactly 6-pack height.
  • The bottoms of the mini-flats are topped by a screened box to keep out the pesky squirrels and birds. (The squirrels dig things up and the birds snip off the sprouts.)
  • The screened tops are also 6-pack height.
  • From this view, you can make out fairly even germination in the 6-pack on the top-right, but less so in the one on the left. (You can't see much of the one in the lower-right.)
In this next photo we again get to see the 6-pack on the left. But wait! There's a whole bunch of sprouts in the two cells at the bottom. What the...?
Lettuce Germination Issue
If we take a look at the hidden 6-pack from the lower-right, we get a clue as to what's going on.
Lettuce Germination Issue
Ah! The parts that are in the shade are the parts that are sprouting quite vigorously! (Oh, the 6-pack in the top-right that has evenly germinated in the blazing sun? That's the basil. It likes the heat. One usually plants it in the spring to go with the tomatoes.)

 So, what's the solution? How do I get the lettuce to sprout? Give it some shade! So, I've improvised a shade cloth, though I really should go get some real shade cloth or burlap.
Shade for Lettuce Germination Issue

So, what do you think of my elephant pot-feet?

Wednesday, September 23, 2009

When Your Day Starts with "What the...?"

Did you ever have one of those days when you went to do something fairly ordinary and suddenly have to stop and say, "What the... ?" Today is one of those days for me.

This morning I went out to start the soaker on the cucumbers, but I stopped on the porch when I noticed that there was a quite large (for my vines) cucumber staring at me from under a leaf. "Dang!" says I. I mean, it was only a couple of days ago that I harvested a half-dozen cucumbers that were anywhere near picking size.

So, I started the soaker and went back into the house to get my clippers and the harvest basket. I came back out, clipped the one cucumber, put it into the basket, and went looking for more. I found another and another and "What the...?" (See? There it is.)
Cucumber, WTF?
Yes, indeed, the cucumber plant had put out a little vine that found its way into less than 1/4" of space behind the trim on the side of the garage and decided that this was an excellent place to grow a cuke.

I had to put down the clippers and the basket to pull the trim out just a little farther because the thing was swelling on both sides of the trim. It came out all right. But there was blue trim paint imbedded in the skin and the trim was not interested in going back into place.
Cucumber Damage Cucumber Damage Repaired
... until I cleared the vegetation from the base of the trim and gave it a sound kick. (You can see where the trim paint came off along the back edge between the trellis strings.)

In case you're interested in what a mutant cucumber looks like...
Damaged Cucumber
You can even see a fleck of blue paint on the left edge at the notch. I had already flicked off a few other flecks.

Never a dull day...

Monday, September 21, 2009

Summer Harvest and Winter Planting

A couple of weeks back I did a post in which I mentioned that I had added SuperPhosphate to my veggie garden because I was getting lots of vegetation and very little in the way of blossoms and "fruit." I also mentioned that a week later I had my first bean blossoms.

Since that post, I've gotten a lot more bean blossoms and, yesterday afternoon, I harvested my first beans -- along with three zucchini and two scalloped squash.
Harvest Basket 9-20-09
This morning I leaned my 10' ladder against the fence so I could reach over the top to harvest the beans that were mocking me from the other side of the lattice-work at the top of my 7' fence. The beans in the photo are about half the quantity I harvested this morning.

When I planned to put the ladder up to deal with the beans, I had planned to tease them back over to this side of the fence, but no-o-o-o-o-o! They had mostly intertwined through the lattice-work then with each other, so there was pretty much no going back. (Add this to Lessons Learned pages.) But, while I was up there, I harvested a bunch of beans and took note that there aren't many baby beans or flowers left on that side of the fence. I'll only have to lean the ladder back up there once or twice more.

In the meanwhile, the various squash plants are slowly producing squash at a rate that is comfortable for a human to consume. The tomato plants (especially the cherry tomato) have suddenly put on prodigious quantities of tomatoes. But they're mostly green. Only a couple have started to turn a little yellow or orange. I can hardly wait till they all suddenly turn red at once.

The cucumbers continue to maniacally produce semi-mutant cucumbers far faster than I can consume... even while giving massive quantities away. (I'm getting really tired of cucumbers. Another item to add to Lessons Learned: one 6-pack of cucumbers is plenty; two 6-packs are wa-a-ay too many.) By "semi-mutant" I mean that the half of the cucumber closest to the stem is very much ripe cucumber-esque. The blossom end, on the other hand, continues to look like a baby, not-ready-to-pick cucumber. If I let it go till the blossom end enlarges, the stem end gets way over-ripe even before the blossom end has ripened. Go figure. Probably has something to do with pollination or insufficient soil minerals or insufficient sun.

About a week ago, on a whim, I bought a 6-pack of cabbage plants. These things need 18" between plants, so they really need a lot of space. So far, I've planted two in 19" pots -- one in each pot -- so I really don't have room to plant anything else (maybe a ring of green onions). I think I can plant another in another pot I have out back. Yes, the first two are planted in the front yard.

Along the way, I have also planted a bunch of 6-packs of seeds for my winter garden. I have two 6-packs of Super Sugar Snap Peas (that are already sprouting) that will be replacing the cucumbers in another week. I also planted a 6-pack of Bloomsdale Longstanding Spinach (no signs of sprouting yet) that will go in front of the peas. I planted one 6-pack each of two different kinds of heirloom lettuce -- one leaf-type and one heading-type -- and a 6-pack of Sweet Basil. I will have to figure out exactly where I can tuck lettuce plants here and there into pots and other spots in the garden.

So! My winter veggie garden has started on its way!

Thursday, September 17, 2009

Changing the Balance

In the hills above Cupertino, the McClellan Ranch Park is tucked in along side Stevens Creek (the creek, not the street), between Deep Cliff Golf Course and Blackberry Farm. The park used to be a working ranch back in the 30s and 40s and it still retains some of that flavor. The city of Cupertino has carved out an area for the Rolling Hills 4-H club and its animals (ponies, chickens, ducks, goats, etc.), as well as space for a community garden. The park is also a bit of a birding hot spot. The Santa Clara Valley Audubon Society is housed in the old farm house. Bluebird houses are mounted and hung all over the park. The riparian corridor of Stevens Creek that bordering the park is an invitation to all sorts of birds.

As part of an inter-jurisdictional plan to have linking trails for hiking and biking throughout the bay area, Cupertino's first segment of the Stevens Creek Trail is being built starting at McClellan Road, heading south along the eastern edge of McClellan Ranch Park and continuing through Blackberry Farm. Being one who actually uses these sorts of trails, I applaud Cupertino for being involved in moving forward (ahead of some other cities - ahem!) to help build out this trail.

As the various entities made plans for the build out of the trail, they tried to take into account all sorts of environmental impact, but some things just weren't foreseen.

To make room for the trail along McClellan Road, they had to take down all the 4-H barns. These barns had been in place for years. They built new barns. To make room for the new barns, they had to move over into the community garden plots where residents had worked for years to improve the soil. To make space for the same number of community garden plots, they expanded the space out onto land that hadn't been put to the plow in decades. So, there was a lot of disruption and a fair amount of upset among the folks being jostled about to accommodate the changes for trail construction. Most folks just breathed a heavy *sigh* and adjusted.

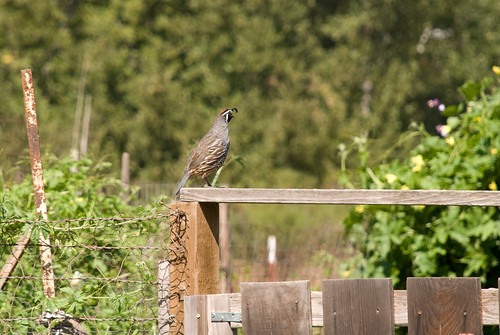
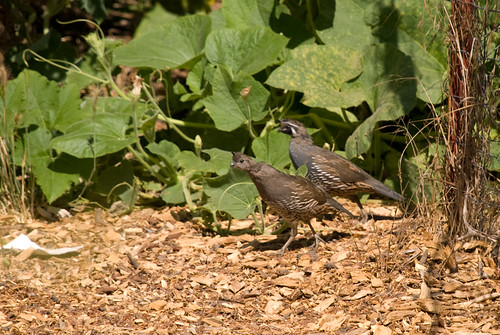
As it happened, another event coincided with all this change and upheaval. The Audubon folks, birders, naturalists, and gardeners all noticed that the local population of California Quail had all but disappeared. Everyone missed them, so they came up with some thoughts on what was happening to the quail. A lot of feral cats were on the prowl in the park, so they decided to trap the feral cats and take them elsewhere. (No, I don't know where. I assume the humane society or other such entity.)

Well, it worked! The quail are back!
Male Quail Keeping the Guard
But so is every rodent species ever known to the area, simply because a couple of changes were made.

Remember the 4-H barns that were torn down? Well, for all those years, those barns housed some animals, but also all the feed, hay bales, and gear needed in the care and feeding of the animals. Feed gets spilled. Bales leak hay. Old gear gets piled in the corners. And the rats and mice turn the barns into palatial habitats. The rodent population explodes. The feral cats have plenty of prey, so their numbers explode. The cats prey on the mice and the rats. But the cats don't know that they're supposed to limit their diets to the mice and rats. They also feed on the "cute" rodents like the squirrels and the bunnies and they feed on the quail and other birds -- just whatever presents itself that seems like food.

The net result was that the cats were keeping the rodents in check (though nobody noticed that part of the equation), but they were also shrinking the population of quail. Now the net result is that the rodent population has exploded, and the quail population is making a comeback.

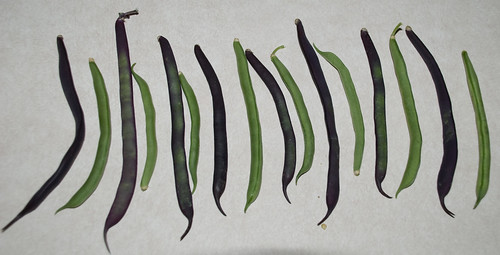
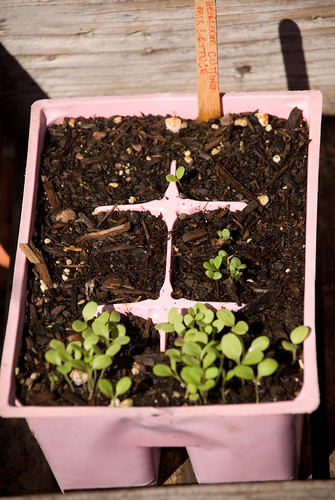
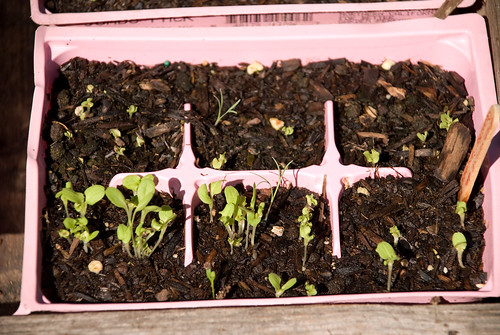
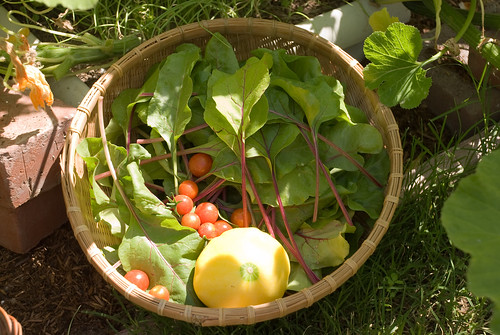
Now lets jump over to the community gardens. These gardens have been in place for many, many years. Some of the gardeners have held the same plot since the beginning. Each gardener gets a plot around which is a wire fence. Many gardeners opt to put in stronger fences. Some add iron gates they have found at salvage sites. For most, the fences are strictly to demark their plot, to stop other gardeners, children, pets, etc from wandering through their plots. For many, the grade of the fence shows a pride of "ownership" (if temporary) and the pride also shows in the tidiness and productivity within. Over the years, the only garden pests have been the gophers and, occasionally, squirrels.

Now we jump forward to last summer. The barns have been torn down and the rats and mice have been evicted, their homes are gone and their easy food sources have been swept away. The feral cats have been trapped and taken away. Every rodent in the area is now free to roam, looking for new food sources. The community gardens are suddenly invaded by squirrels, bunnies, and rats! And, of course, they still have to contend with the gophers. The gardeners are frantic in their efforts to actually be able to grow a crop. They bury fencing wire all around their plots. They bring in reclaimed bricks and boards. But every visit to the garden finds another spot where someone has dug under or climbed over and dined on their crops.

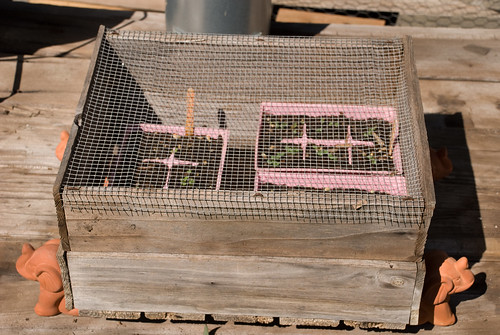
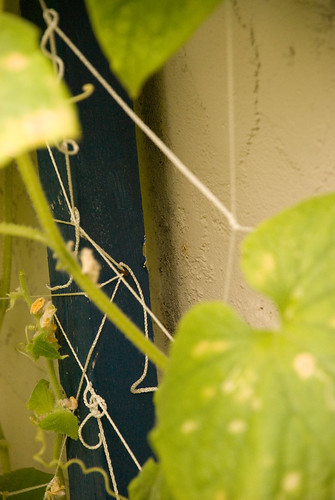
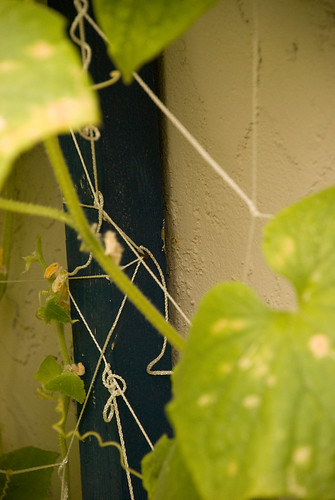
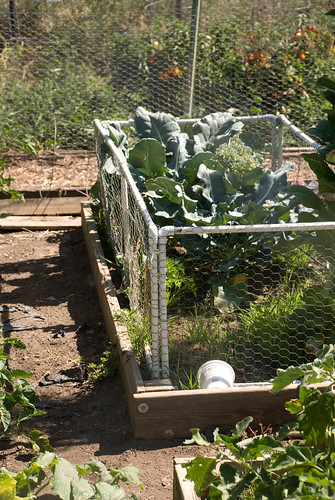
Many of the gardeners, in addition to reinforcing the perimeter fencing, are building all sorts of cages to go around and over the individual beds. These broccoli plants got a poultry wire cage framed with PVC piping.
Cabbage Cage
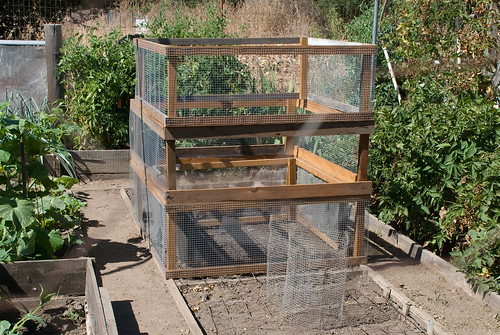
These stacked cages, framed in wood and covered with hardware cloth, await the next planting cycle.
Stacked Cages
As you walk through the gardens, you start noticing the plots where the gardener has given up the fight in mid-season and where plots have been entirely abandoned.

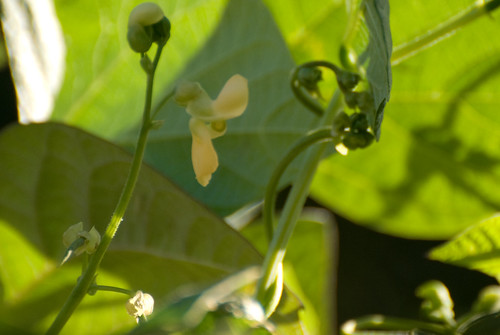
Last year, the Master Gardeners attempted to do a trial of Edame (fresh edible soybeans), but the crop failure was complete. Despite all their efforts to add buried fencing material, add well-anchored row-covers, pile rocks and boards along the base of the perimeter fence, and all the other preventative measures, they harvested NO edame. It all went to bunnies, squirrels, rats, and birds. (You could see the beak-bites in what was left of the leaves.) This year the crop is winter squash. It's doing much better, but they had a couple of work days that were seriously focused on reinforcing the perimeter fence.

To be completely fair, I must also mention another animal that is stealing the crops from these intrepid gardeners. It is a two-legged animal. A number of the gardeners have strengthened the gates onto their plots and have installed shiny new hasps and padlocks. Walking along the paths, it is these plots that still have an abundance of produce along with a lovely garden habitat in the form of a chair or two and some sort of "garden decor."

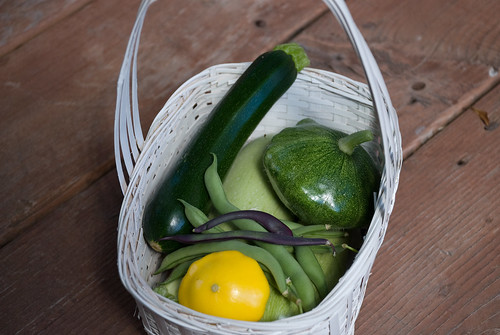
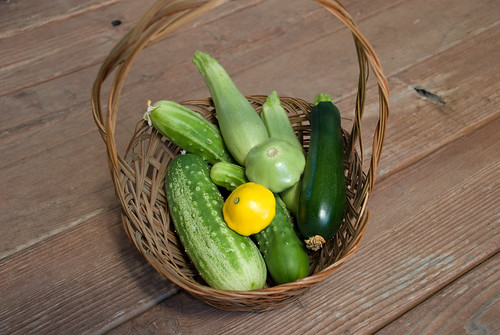
And who can resist spending a day in the garden when you get a chance to bring home fresh, tasty produce grown with your own hands and to catch a view of these little guys dashing through the garden?
Quail Pair

Nature, as it is wont to do, is in the process of re-balancing itself. The gardeners are starting to report seeing snakes around the community garden. So far, the snakes are small (pencil- to finger-thick), but even the small snakes can dine on baby rats, mice, and squirrels. And other birds are growing in numbers. I heard a hawk calling from up in a tree, so the hawks know there's plenty on the table below. Hopefully, the gardeners who gave up in frustration will come back and try again as things get back into a new balance.


Tuesday, September 15, 2009

Garden Blogger's Bloom Day, 15 September 2009

Another month has gone by and it is, again, GBBD. Here's what's blooming in my yard:
  • Squash, zucchini and scalloped (as promised last month)
  • Tomatoes, cherry and beefsteak
  • Pole beans, green, yellow, and purple
  • Roses
  • Lobelia (a volunteer trailing blue variety)
  • California poppies
  • Canna lilies
  • Tuberous begonia
  • Impatiens
  • Nasturtiums
  • Chrysanthemums
  • Allium (that some random, semi-invasive, onion/garlic species)
  • White "potato" vine (Solanum rattonii?)
  • "Purple potato plant" (Multi-trunk standard landscape Solanum )
  • Geraniums
  • Plumbago, creeping and vining
  • Cucumbers
  • Sunflowers
  • Rosy buckwheat
As you can see, the list is much shorter this month than it has been. The only CA natives still thinking about blooming at this point are the poppies (and very-danged-few of those) and Rosy buckwheat (which gets supplemental water and is in high shade all day).


Thursday, September 10, 2009

Soil Fertility - A Complex Subject

I planted my lovely veggie garden in July. In each of the "raised beds," I added 1-2 cubic feet of home-grown compost, albeit buried under 3-4 inches of native soil (to smother any weed seeds). In the center back area, I added a touch (about 1/2 inch) of "top dressing" in the form of commercial (i.e., weed-free) compost. Other than these treatments, I added no "fertilizer" -- inorganic or "organic." (Technically, adding the compost -- both types -- is adding fertilizer, but "organic" fertilizer.)

Additionally, when I moved in -- and periodically thereafter -- I mulched the whole area with at least 6 inches of commercial Redwood Compost. Over time, the mulch breaks down, is transported underground by various organisms (including earthworms), and just seems to melt into the ground. This actually feeds the soil (and the organisms that live in the soil) over time.

As it turns out, when I planted the seeds and transplanted the seedlings, I pretty much had to jump back because everything came charging out of the ground like gangbusters. Happy! Happy! Joy! Joy!

However, this is not necessarily a good thing. It means that everything has plenty of nitrogen. Nitrogen is needed for strong stem and foliage growth. It's the N of the NPK ratio that's printed on every box or bag of fertilizer (organic or inorganic).

Plenty of nitrogen is good, but it's not enough. What about making actual fruits, like tomatoes, zucchini, squash, and beans? What about making the flowers that lead to the actual fruits? And what about the roots of the carrots and beets?

Well, that's where phosphorus comes in. P (the second number on the box or bag of fertilizer) is responsible for healthy root growth and flower and seed production. No P, no flowers, no fruits, no seeds. Bummer!

I knew I had a problem (not enough or unavailable phosphorus) because the tomatoes were rampantly growing into wildly gigantic green vine-y shrubs and hardly putting on any blossoms. I knew I had a problem because the bean vines had reached over the top of the 7-foot fence and had put on no blossoms. I knew I had a problem because the very few zucchini and summer squash fruits could sit on the vines for a few days without growing into serial killers.

OK. So, I need to add a source of phosphorus. As you might have guessed, I prefer to garden "organically." I prefer to use compost and even make my own. When I resort to commercial additives, I prefer to go with an "organic" alternative. For example, if I needed to boost the nitrogen levels in the soil, I could use blood meal (yes, made from blood), fish meal, or fish emulsion fertilizer. (The bonus for this last one is that, while the numbers are low -- 5-1-1 -- you can actually mix it with water and spray it right on the plant for instant absorption and jump-back growth. But I digress.)

The "organic" alternatives for phosphorus are bone meal, bat guano, and rock phosphate. But this is a problem. All of these alternatives are very high in calcium and miscellaneous salts. The reason this is a problem is that the soil in this area is already quite high in calcium and other salts quite naturally because this used to be a seabed before the Pacific plate jacked us up. And this is exacerbated by irrigation because our water is so hard (very high in dissolved calcium salts). And, besides, these "organic" solutions take months to work.

Did I mention that this is a complex subject? Well, here's another complexity. It's quite possible that there is plenty of phosphorus in the soil, but it's just not available to the plants because the soil pH in the dry regions of the west (and this is one) is naturally well above 7.0. Why? Because our hot, dry weather concentrates the naturally-occurring salts in the top soil through evaporation and the salts cause a too-high pH. Phosphorus needs a pH of 6.0 - 6.8 to be "available" to the plants.

So, gotta repair the pH. "Organically." The "organic" solution is to mulch the area with pine needles or redwood compost. (Oh, wait. We've been doing that.) The other "organic" solution is to add ground sulfur to the soil. I added it, but it takes time (months) for that to work.

So, I went nuts. I went officially non-organic. I added a wee touch of a product called SuperPhosphate. It's a form of phosphate that doesn't suffer from extra calcium, just a bit of extra sulfur. Oh, baby! A week later...
Bean Flower & Baby Beans
Rich yellow bean flower and two embryonic green beans in the lower left corner. The rest of the vines are showing similar progress. There are yellow, cream, and purple bean flowers all over the top third of the vines along with a bunch of baby bean pods.

At the same time as I gave a touch of SuperPhosphate and sulfur to the beans, I gave the same mix to all of the veggies except the beets. They all are responding either with more blossoms, more fruits, faster fruit growth (indicating faster seed growth), or faster fruit ripening.

What a difference a week makes!

Am I worried? Non-organic fertilizers are supposed to be death to the soil and the organisms therein. But, given that I have spent years feeding the soil with compost, I don't think one light application of SuperPhosphate is going to undo all the work that all that organic matter has done. For one thing, compost is The Great Soil Corrector. (Huh?) Soil too basic? Compost will acidify it. Soil too acid? Compost will buffer it. Soil too sandy so your water drains away too fast? Compost will hold the water. Clay soil? Compost will make air gaps so water drains and your roots can breathe. Compost invites earthworms to dine and the worms make tunnels for the roots to grow through and their castings (worm poop) is a highly-concentrated, readily-available fertilizer. Compost has carbon and nitrogen, the building blocks your plants need to grow -- and they are slowly released into the soil at a rate your plants can use.

I will continue to top-dress with compost to give the soil all of those benefits and help mitigate any damage I might have done with the SuperPhosphate.

And that's just about correcting an apparent phosphorus deficiency. I told you it was a complex subject.

Wednesday, September 9, 2009

Eating Fresh from the Garden

This morning I went out to water the beets that I'm growing for the greens because I was thinking about harvesting some greens later in the day. While I was there, I noticed that the cherry tomato is finally ripening a number of tomatoes. Yay! While I was picking tomatoes, I noticed that a yellow summer squash had hidden itself over the edge of the planter under some tomato leaves. Thus, we have today's harvest.
Today's Harvest 9-9-09
This is a dozen cherry tomatoes, a good serving of greens (once they are stemmed and steamed), and a good serving of squash. Throw in a main dish and maybe a small potato and you've got a wonderfully healthy meal for one.

However, I've been falling behind!
Previous Harvest
Yes, this is the basket of three cucumbers, three zucchini, and two small summer squash that was already sitting on the counter awaiting my attention. Good lord! Well, I have a recipe for curried cucumber, so I think that's going to be my main dish (after I add some red lentils).

In case you've lost track, that means that, other than some red lentils, plain yogurt, and some seasonings, dinner will be from my own garden. Yummy!

Tuesday, September 8, 2009

Veggie Garden in Winter?!?!

Last week I made a post on Facebook indicating that I was pondering whether to start a winter veggie garden. While I knew that many of my FB Friends were gardeners (or, at least, very familiar with gardening concepts), I was surprised to learn that a number of them were utterly unfamiliar with the idea that one could actually grow vegetables in winter. (Yes, you can. Especially in California!)

My ponder was more about whether I felt up to reclaiming another chunk of my Traditional Landscaping for turning into veggies. (Recall that I had reclaimed an 8' x 4' area of Traditional Landscaping earlier in the summer. While the post was done in mid-August, some of the seeds were started in June and the garden was planted in July.)

To answer the question of my friend who was surprised by the idea of winter vegetable gardening, yes! you can plant in September and October. Appropriate vegetables include beets, carrots, garlic, green onions, lettuce, radish, turnips, peas, spinach, and just about every vegetable in the cabbage family (cabbage, broccoli, cauliflower, arugula, kale, collards, mustard greens, rutabaga, kohlrabi, broccoli rabe, bok choy, Chinese cabbage, and more). (Actually, those radishes and turnips are in the cabbage family, too.)

Most of the veggies listed really hate hot weather and will either turn to a crisp or bolt to seed and become bitter, tough, or otherwise inedible. Yet, at some point, the weather is likely to turn too cold to support growth or even so cold as to freeze your crops to the ground. But many of these veggies either don't care that their tops got frost bitten (carrots, beets, turnips, radishes, ...) or actually taste better after a good frost (kale).

Lettuce is "tender" in a couple of ways. It will freeze and turn to mush if it gets too cold. But it will also "sunburn" (turn dry, crisp, and brittle) if left in the hot summer sun. You can prevent the "sunburn" by using shade cloth, but it will still be inclined to rush into seed production in the hot weather. This makes it a good crop to start in the early spring -- for harvest before the heat of summer -- or in the fall -- for harvest before it freezes to mush.

Spinach (and some of the other greens) are also likely to bolt to seed in the heat, but they are more resilient when it comes to the cooler weather of the fall and early winter.

As for me, I still haven't decided whether to reclaim more Traditional Landscaping, but I have decided that I can and will start at least a small winter garden. The row of cucumbers that is growing up the side of the garage is definitely starting to age and I'm starting to tire of dealing with vast quantities of cucumbers. Later this month I'll pull out the cucumbers and put in a row of Sugar Snap Peas to climb the trellis and a row spinach in front of them at their feet.

In the meanwhile, I'll keep looking around the yard for a likely location for more veggies (without actually tearing out the whole back lawn because that would be WAY too much work).