Wednesday, October 28, 2009

Random Thoughts for a Windy Day

Yesterday morning our area was hit with a cold, blustery wind that is continuing today (and maybe tomorrow). There's not much that must be done in the yard immediately, so I thought I'd share a few random thoughts.

A friend posted on Facebook that he'd heard that one fertilized chicken egg leads to one flu vaccination, but he was looking for confirmation of this surprising detail. I did a couple of lookups and it comes down to between one and two fertilized eggs are used to come up with one injection. (However, the same amount of eggs results in hundreds of the inhaled version. The injected version is a killed virus. The inhaled version is a dilute, weakened-but-live virus.) That led to a discussion of how very many roosters and hens have been doing what they do in the name of flu vaccinations.

Having kept chickens (and ducks and geese), I can tell you that it doesn't take that many roosters!  Opinions vary, but somewhere between 1-to-8 and 1-to-30 are the numbers quoted for how many roosters you need for how many hens. If you're going for maximal fertility, 1:8. If you're just keeping chickens for the eggs, you really don't need a rooster at all. But a neighbor had a dozen hens and only the one rooster and all her hens were bald from the rooster... um.. holding on to.. um... When she increased the flock (hens only), they got a lot less bald.

Chickens are great to have around to keep the bigger bugs in check. Mine did a great job on eating the Gypsy Moth larvae before they finished eating my oak trees. They were quite the hysterical sight, watching them try to chase down crickets and grasshoppers. They'd dash up to one and, about the time they'd go to peck it, the thing would jump four feet. The chicken would dash the four feet and stop. The cricket would jump. Chicken dash. Cricket jump. It's amazing that they ever got anything to eat. But they  were quite willing to eat almost anything I threw out into their pen. They simply adored watermelon rinds!  (And, yes, I fed them chicken feed and cracked corn, too.)

At the same time that I had the chickens, I also had ducks. There were only the three of them. Ducks are also good at eating the bigger bugs. They're also good for eating slugs and snails. Sadly, they're also really good at eating every freshly sprouted sprout and every freshly-transplanted vegetable start in the garden if you don't keep them out! The chickens can do the plants some damage, too, but not as much as the ducks.

Along with the chickens and ducks, I also had three geese. The big male tended to be mean and aggressive, but could be intimidated. The smallest one was like a little puppy. She would follow me around. She would walk with me down the drive and across the road to my mailbox. But, after I would retrieve my mail, she would sit down and insist on being carried back to the house. But she sat quietly, tucked under my arm, helping me open and read my mail till we got to the porch where I would set her down next to me while I finished with the mail.

She would continue to check on the mail, but then would gaze around the yard. Occasionally she would talk to me in whispering tones. If I whispered back, she would whisper some more. But if I spoke to her, she would honk. That would set the other geese to honking. When they would start honking, she would stand up and honk LOUDLY. So her friends would start honking LOUDLY. That's the bonus of geese. They are terrific guard animals. They raise a louder alarm than dogs!

Oh, and ducks do NOT make great pets. At least the ones I had didn't. When I would try to pick one of them up, it would do its darndest to slash me open with those talons flailing wildly. The chickens and geese were much more mellow about the whole thing. They'd eat from my hand and generally gather around whenever I was out in the yard.

Of course, I built them a house. It was known as Chez Poullet.

Friday, October 23, 2009

Summer Wind-Down Continues

It's been over a week since I posted about the big rain -- the start of The Wet Season! Since then, we've had a mix of vaguely-warm, cool, damp, and humid weather. It's turning out to be The Year of the Mushroom.
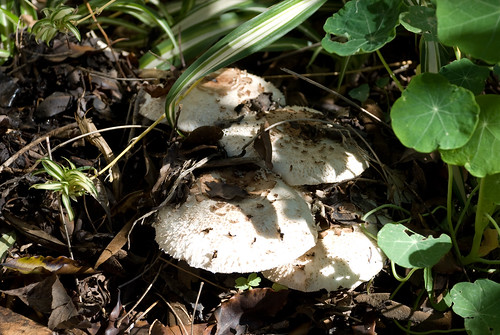
Year of the 'Shroom
This is only one example of the (at least) five different kinds of mushrooms that have been popping up around my yard. Mind you, I've seen many of these mushrooms before, just not all at the same time, or even in the same year! I continue to hold to my philosophical approach that they are merely doing the job in the garden of breaking down complex (plant) materials, making them more readily available for the living, growing plants to consume.

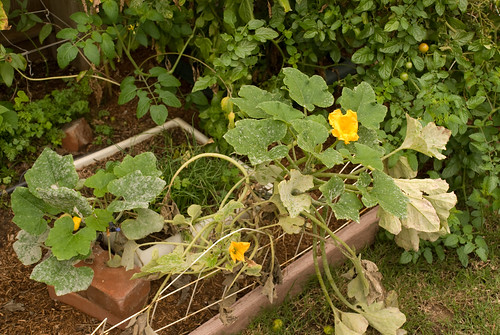
Mushrooms are, of course, fungi. So is the powdery mildew that is consuming the scalloped and zucchini squash plants.
Mildew Bloom After Rain
The zucchini plants continue to try real hard, but they are definitely falling behind. The scalloped squash, on the other hand, are just plain losing the battle.
Very Tired Squash
And, if you'll notice on the lawn below...
These Squash Gave Up
these little baby squash have committed suicide.

So, I bit the bullet last night and started taking out the plants that needed to be taken out. I started with the poor scalloped squash plants above, then turned my attention to the zucchinis. I started by looking them over to see if there were any new squashes coming on and there were, so I went for a more conservative approach. I started pruning out the leaves that were most heavily infested with powdery mildew and continued till I had mostly healthy leaves, some lightly-infested leaves, some stalks, and very-dang-few zucchini. *sigh* At that point it was easy to see that the two plants that were trying to produce (light-green) zucchini could stay a while longer, but the other two plants were just done-for.

But, in an attempt to try to make life a little less miserable for the remaining zucchini, I decided to whack back  some of the non-producing arms of the non-producing beefsteak tomato. (I discussed the fact that excessively rich soil probably doomed me to lots of green vegetation and very few -- if any -- tomatoes in an earlier post.) Well, I was whacking and hacking and hewing and creating quite the pile of green vegetation when I noticed this:
Tomato Hornworm
Holy crap! And there was SO much vegetation that I couldn't even find where it had actually done any damage. Tomato hornworms start out small (small fraction of an inch) and go through several "instars" (shed their skin and pop out bigger and bigger and bigger...). This is about as big as they get. At this size they can actually eat full-sized tomatoes!  Gah!

But, I have a friend in my garden who likes these bad boys... *without* butter and garlic!
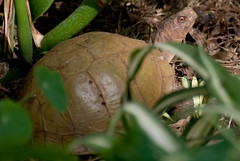
Shelley's New Hide-y-Hole
If you look closely, you'll see the green stem that the hornworm was attached to in the previous photo. I had pitched it in front of Shelley's new hide-y-hole last night so she could discover it for breakfast (or a midnight snack). An hour later it was in exactly the same position. This morning there is of sign of the bugger and the tomato stem is actually closer to Shelley's hideout than it was last night.

Yay, Shelley!  (I also tossed out some baby squashes that didn't make it in case she wanted a side dish.)  About an hour after I took this photo, Shelley had burrowed back into the depths of her cave, presumably to digest. She's usually out on patrol for tasty tidbits or water at that hour.

Oh, yeah. Here's Shelley's other idea of "hiding."
Shelley Hiding: definition 1

In the meanwhile, the California Native Grape is finally deciding that it's time to ripen its berries.
Finally! Ripening Grapes
By this time last year, this plant had put on large numbers of massive, tight bunches of grapes, had ripened them, had dropped them, and had started turning its leaves to bright Fall colors.  Definitely a "different" year than last year.

Monday, October 19, 2009

Root Knot Nematodes

Several days ago I wrote that the cucumbers had become bitter and that I had pulled them out. In a later post I mentioned that I discovered that I had Root Knot Nematodes. Arrrrrgh! 


How did I know I had Root Knot Nematodes?
Viz:
Cucumber Roots & Nodules
Cucumber Root Systems Cucumber Root Nodules
A quick lookup told me that I had Root Knot Nematodes.


How do you get them?
How did I get them? I don't know. At least nothing for sure. I know that I didn't have them (or didn't have them bad enough to cause a problem) for the first several years here and in that location. For the first several years I grew tomatoes -- big tomatoes, little tomatoes, cherry tomatoes, beefsteak tomatoes, lemon tomatoes, pear tomatoes -- all along that space. Mind you, I planted these tomatoes in a different location along this walkway every year. First at one end, then the other, then in the middle.


Then, suddenly one year, the tomato crop was minimal. And the next year the plants wouldn't even grow. And the year after, they grew a while, but then acted like they had a really bad case of the wilts. In retrospect, it was probably all nematodes.


But the thing is that there were two things I did between when the tomatoes were awesome and when they were crap. The first was that I tried  product that contained (among other things) mychorrizal fungi. These fungi are supposed to help build a soil-building web of organisms to make plants grow more efficiently. (For a while I was suspecting that this product -- full of living organisms -- was the culprit.) The other thing was that I accepted some home-grown transplants for that bed. 


And that's how it usually happens: infected soil is added to "clean" soil.  OK. So that's kind of the "good" news. My infected planting zone is pretty much bounded on all sides by concrete. It's a planting bed between a  garage wall and a walkway and a driveway and a porch. And the builders were a little sloppy when they dug the footings and built the concrete frames, so most of the space is also bounded on the bottom by concrete.


How do you get rid of them?
The bad news? You can't. Like, you just CAN'T. 


Well, if you excavate ALL the infected soil and replaced it with "clean" soil, they'd be gone. But, if you don't get every last stinking nematode, they'll reproduce and eventually return. And, there *might* be a chemical you could apply and have it actually work, but pretty much all but a couple of chemicals have been banned as being WAY too toxic for everything else. And the ones that are still legal aren't completely effective. Honestly, if you don't apply them when the soil has the right level of moisture and the right temperature to the right depth with the right equipment, they're apparently almost completely INeffective. (Some of these chemicals are called "fumigants" because they are gaseous.)


The "good" news is that most of the "organic" solutions are relatively effective at keeping the nematodes under control. The idea is, make the soil healthy and the healthy-soil organisms will help kick nematode butt. Specifically:

  • Add lots and lots of compost and other organic matter. 
  • Use a non-host (more on this in a bit) cover crop then turn it under as a "green manure."
  • Use plenty of organic fertilizers such as bone meal to increase phosphorous and potassium.
  • Rotate your crops so you're not growing related plants in the same place each time (e.g., tomatoes, eggplant, and pepper are all related, so don't plant peppers where you planted tomatoes or eggplant last year).
  • Let the area go fallow periodically as part of the crop rotation plan.
  • When you let the area go fallow, use a non-host plant to hold the space.

Host vs. Non-Host, Cover Crops, Green Manures
Simply, a "host" plant is one that the root knot nematodes really enjoy. A non-host plant is completely inhospitable to the root knot nematodes. Except that it's not that simple. There's a continuum of host/non-host plants. From what I have been able to gather, grasses (like sorghum, barley and other grains) lean toward the non-host end. Hosts are all the yummy things like cucumbers (and melons, squash), tomatoes (and eggplant, peppers, potatoes), carrots, lettuce, and so on. 


Interestingly, the brassicas (cabbage, broccoli, cauliflower, radish, turnip, etc) lean toward the non-host end of things. Also in the brassicas are field mustard and rape. Here, in what's now known as Silicon Valley, the orchards that once filled the valley used to use field mustard as a cover crop/green manure under the fruit trees. Late every winter, the valley was covered in yellow blossoms with dormant fruit trees poking out above the sea of yellow. Come spring, the orchardists would disc all the mustard into the soil. A few weeks later, the orchardists would come back and plow in the irrigation furrows.


One of the things I learned when researching what I could do about my infestation was that, during the breakdown of the field mustard, certain gasses (fumigants) are released that kill the root knot nematodes! And, as we already saw, the organic material helps feed the other organisms that kick nematode butt. Awesome!


What am I going to do about them?
Well, for now, I'm growing this winter's crops in recycled recycling bins above the infested soil.


In the meanwhile, I'll be adding massive quantities of compost to the soil along with sulfur (to help correct the pH), rock dust (to add in elemental micronutrients), and bone meal (to boost the phosphorus level). I'm going to try to track down a local source of field mustard or rapeseed to grow a non-host cover crop/green manure.  


I plan to leave the bed basically fallow for at least a year, so next spring I'll be planting summer veggies in the tubs again. But before I do that, I'll let the tubs dry out (so they won't be quite so heavy to lift), move them out of the way, and turn under the cover crop. 


Another suggestion for helping rid the soil of nematodes is "solarization." So, I was thinking about covering that strip with plastic before moving the tubs back into place. In that way, the space can have the whole summer to try to build up enough heat to bake the little buggers. (And, maybe it will help trap the gasses produced by the breakdown of the green manure.)


Wish me luck!

Friday, October 16, 2009

California's Seasons, Part 2

In my post Wednesday, I talked about how California basically has two seasons: Dry and Wet. The rest of the world commonly refers to these as Summer and Winter (in that order). For documentary evidence of California's seasons, I refer you to the lyrics of the old Albert Hammond song "It Never Rains in Southern California" where he sings "It never rains in California, but girl don't they warn ya. It pours, man it pours."

I also talked about the winding down of my Summer garden and promised that I'd talk about my Winter garden in my next post. As promised...

Ready for Winter
As I mentioned in a couple of earlier posts, I decided to work at putting in a winter veggie garden. I have pretty much finished starting seeds in 6-packs, transplanting seedlings, and direct-seeding my winter veggies just in time for our Wet season.

I bought a 6-pack of cabbage seedlings a few weeks ago. I gave some away, transplanted two into a pair of really big plastic pots (one per pot so they'll have plenty of room to grow).
Caged Cabbage
The poor thing is caged because the neighborhood cats like nothing better than to use these pots as their litter box and the squirrels tend to cause damage to my plants in favor of planting their nuts. I have potted up the other two seedlings I kept to 1-gallon pots to give me a little time to find two more roomy places to plant them. (In the ground they need 18 inches between centers.)

About a month ago I seeded two varieties of heirloom lettuce (head and leaf) in 6-packs. This weekend I transplanted them into rectangular plastic planting tubs that I reclaimed from lackluster "traditional" plantings (gladiolus in the one and bearded iris in the other). Already they have settled in and are growing stronger by the day.
Leaf Lettuce Transplants
As you can see, the plugs from the 6-packs are chock-full of loose-leaf lettuce seedlings. Oddly enough, I had thinned each and every cell down to a couple of seedlings each several days before transplanting. All of those little seedlings have sprouted since they were transplanted! Yes, I need to re-thin all those seedlings.

Over a month ago I seeded Super Sugar Snap peas in 6-packs. Their germination rate was disheartening, only about 25%. Still, that gave me a half-dozen seedlings to transplant.  When I removed the cucumbers I discovered that the soil in that bed is heavily infested with root knot nematodes. (I'll be doing a separate post about this a little later.) So, the planting bed where I had planned to plant the peas is basically unusable for now. I had to come up with an alternative.

My alternative is a little... ummm... creative. In my neighborhood, we now recycle using a ginormous, wheeled toter into which *all* recyclables are placed. We used to use three bins, one each for glass, cans, and newspaper. We had a choice of turning in the bins to be recycled or keep them for reuse. Well, I had kept mine. Specifically, I had kept mine to use as planting tubs... someday. Well, this is now "someday."
Recycled Recycle Bin
I spray painted the bright-yellow bins (with black illustrations on how to recycle in three languages) "Hunt Club Green" and filled them with a mixture of "Planting Mix" and "Garden Compost." I put the painted, filled bins on top of cinder blocks on top of the infested soil. I transplanted the pea seedlings into the first bin and direct-seeded more peas into the second bin. I will direct-seed another set of peas into the third bin this weekend.

Also in the recycled recycle bins, I planted two rows of bok choi in each bin. Amazingly enough, the rows of bok choi are jumping up out of the soil at an alarming rate. That's another set of seedlings that I need to thin very soon.

Meanwhile, I have direct-seeded some Bloomsdale Longstanding spinach into a pot, some Baby Leaf Catalina spinach into another pot, and Jewel-Toned Beets (Red, Gold, & Candystripe) into yet another pot. (These beets are intended to be grown for their roots, but I'll probably also harvest some greens.) The beets have already started sprouting and I have already started thinning them. The spinach are still in stealth mode.

In addition to the above, I'm also growing some herbs. I transplanted some dill and chives into a pot a few weeks ago. The chives seemed to be thriving, but the dill was not. It was looking a little more sad each week. Well, I got in there with my reading glasses today and discovered that it was infested with two kinds of aphids. I have now sprayed them with some soapy water. That should do it, but I'll have to keep an eye on them AND the rest of the veggies in the area to make sure they didn't travel.

I also transplanted some Sweet Basil that I had started in a 6-pack into a window box-like planter. Hopefully I can get some harvested before they are nipped by cold.

So, there you have the starts of my winter garden. There's still plenty of summer garden left giving me fresh vegetables. The winter garden is off to a grand start. There's still more to do (like planting the third recycle bin and thinning seedlings), but I like how it's going so far.

Thursday, October 15, 2009

Garden Bloggers Bloom Day, 15 October 2009

Here it is again: Garden Bloggers Bloom Day!

Before I launch into the list of what's blooming, I'll note that here in Silicon Valley we had our first storm of the Wet season and it was a record-breaker for some areas. In San Jose we officially got 2.33 inches, but the record for that date was 3.22 inches in 1962. Records notwithstanding, this storm makes this the wettest October in recent memory. The drought's not yet broken, but this is a much needed step in the right direction.

On to the list of what's blooming in my garden:

  • Roses
  • Tuberous begonia
  • Nasturtium
  • Nandina
  • Chrysanthemum
  • Canna lilies
  • Squash
  • Tomatoes
  • Pole beans
  • Calendula
  • Impatiens
  • Strawberry
  • Geranium
  • Solanum rattonii (this thing blooms almost constantly!)
  • Purple Potato Plant (likewise)
  • Plumbago (creeping and vining)
  • Rosy Buckwheat (this is a surprise)

Wednesday, October 14, 2009

California's Seasons

For those who live outside California, you know that the seasons are Spring, Summer, Fall, and Winter. In California, the seasons are Dry (and usually warm-to-hot) and Wet (and usually cool-to-cold-ish). Dry can start as early as February or as late as June. Wet can start as early as October or as late as January. Sadly, the Wet season isn't always as wet as we'd like it.

Well, the Wet season has started. It started yesterday with a bang: an October-record breaking storm! So, I think now is a good time to talk about the winding down of what everyone else calls Summer and the start of what everyone else calls Winter.

Summer Winding Down
A couple of weeks ago I removed the cucumber vines. They were getting bitter, which is a big red flag to just yank them out. They won't get better, only worse.

Also a couple of weeks ago I also started hacking out squash leaves that had mildewed badly. I wanted to see which plants had given up and which plants were worth keeping. I removed about half the total number of squash plants. The remaining ones have decided to put in a little extra effort and are producing more and faster than all the plants together had been producing. (LESSONS LEARNED: If you plant twice as many seeds as you think you need in case one doesn't sprout and they ALL sprout, thin them out straight away.) I harvested four small zucchini this afternoon for tonight's dinner. There are a number of baby-sized scalloped squash waiting for harvest later this week.

About a week ago I finally thinned the beets. (see also note above, but...) The thing about "beet seeds" is that the "seeds" in the package are actually seed clusters. So, when you plant a single "beet seed," you are really planting about five beet seeds. You really need to start thinning the sprouts right away if you plan on growing large, tender roots. In my case, I was growing them for the greens, with the roots of this variety being inconsequential. Still, each cluster that came up had now produced a small beet (regular- to shooter-sized marble sizes), so I harvested a dozen beets while I was harvesting a bunch of beet greens. The beets, including the greens, will continue to grow well into the California version of winter.

The green and purple bean vines are starting to look a little tired and it's no surprise. They are a warm-season crop. However, despite looking tired, they continue to be quite productive and are putting on new flowers daily. I picked a small basket half-full this afternoon.

The tomatoes continue to ripen and will do so pretty much up until the first hard freeze (unless I build a coldframe/greenhouse over them). Sadly, it looks like whoever is stealing my cherry tomatoes has made off with the green beefsteak tomatoes in the last two days. *sigh* I picked half a "strawberry basked" (you know, those green plastic things you get at the store) of cherry tomatoes this afternoon. There are plenty more that are green or starting to ripen.

I need to thin the carrots. It will be a pain-in-the-butt, which is why I've been putting it off. I should also thin the scallions (interplanted with both of the squashes, but only seem to be growing with the scalloped squash). I can use the thinnings as chives.

Oh, yeah. I went nuts about three weeks ago and bough a leftover 6-pack of strawberry plants. Think: Charlie Brown's Christmas Tree. These poor things were put out for sale last spring and left to sulk in their 6-pack packaging. Well, I had one of those wide-but-shallow pots (the kind they sell with too many annuals planted as "Color Spots"), so I filled it with fresh soil, cleaned the dead leaves from the berry plants, and planted them. I had to trim off a couple of runners so the plant would focus on growing new roots into all that new legroom. A week later, one of them was trying to bloom! Wow! Well, I still want it to focus on roots, so I plucked the blossom. A week later, another plant was trying to bloom! Same deal.  Looks like I'll have strawberries next spring!

So, I will still have some "Summer" vegetables for quite a while and some of the vegetables I planted in summer are intended to grow well into or through winter. But I also have started my Winter vegetables, which I'll talk about in my next post.

Wednesday, October 7, 2009

Wisteria Weaponry

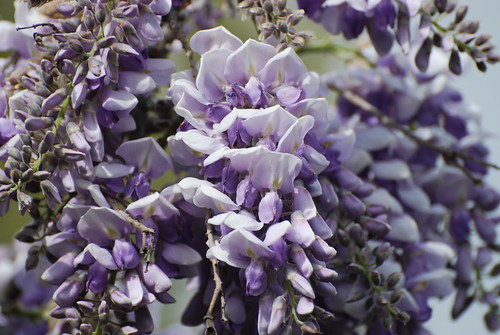
About twelve years ago, I planted a wisteria vine at the northeast corner of my deck and trained it up the support post to the deck roof and across the lanai along the back. Last spring, the wisteria was blooming quite maniacally and putting forth a cloying scent.
Wisteria
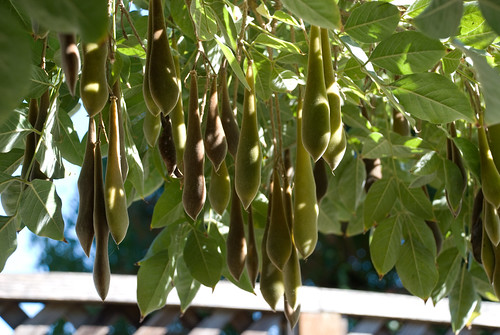
Now, in October, the same vines are covered with fat, green, fuzzy pods that are starting to turn brown.
Wisteria Seed Pods

Some plants rely on birds to eat their seeds, carrying them away in their digestive tract to some distant location to deposit along with a healthy dose of "fertilizer." Other plants rely on birds and squirrels to cart their seeds off and stash them in the ground for future reference. The bird or squirrel that planted the seed may return to eat it later, or it might forget the seed, leaving it to sprout into a new oak or walnut tree.  Other plants make little airfoils, parachutes, or balloons for their seeds so they may be carried away on the wind. Still others put burs, hooks, or gummy substances on their seeds so that passing animals will pick up the seeds on their coats to be dropped off farther down the trail.

Then there are the plants with spring-loaded, hair-trigger seed pods. Our native winter cress has long, thin seed pods that, when ripe, will explode seeds at the barest touch, flinging the little seeds up to a foot away from the little plant. The California Poppy is the same way.

Then there's the wisteria. When those seed pods are fully ripe, brown, and dry, they pop with a *CRACK* that sounds like small arms fire. And they fire their nickel-sized slugs... er... uh... seeds with such force that it sounds like a BB hitting the patio door. They can fire those suckers to the far end of the yard! My wisteria is growing in the northeast corner of the yard and I found these seeds sprouting on the west side of the house while I was pulling weeds this spring. The sprouts were still line-of-sight to the old pods, but just barely.
Wisteria Spent Round
The brown, fuzzy, spiral, ribbon-y things are the remnants of a pod that split and fired its rounds at me.

Really, when these things really start firing at my, it's like being at the range. I had told my brother (former Army expert, marksman, sharpshooter) about this a few years ago. But the following fall, he had forgotten about it when he was visiting me. *CRACK* - *PINK!* With a panicked look on his face, he  cringed and started to dive for cover... till he saw me calmly staring back at him. He stood fully erect again and said, "That was that plant, wasn't it."

Yep.

Wisteria Shell & Seed
This half-pod escaped the vine with one of its seeds still attached. Sometimes the squirrels taste-test the pods, but they always end up leaving the remnants on the ground, unconsumed.

As for this year, the shooting has just started. How rapid they fire depends on the heat and the humidity. Hotter and dryer means they ripen and dry faster and start erupting faster. I also learned that, if the winter is not terribly wet, any unexploded rounds will decide to start exploding during warm spells in the winter and early spring.

So, I'm just starting my season on the firing line.

(To my military friends and family- no they're not nearly as loud as the .22 calibre semi-auto the drug dealer was firing out in the street a couple of years ago. But still... )